Monday 20 October 2014

On Silken Thread - Darkroom Door


I've been having a wonderful time playing with Darkroom Door's 'Carved Leaves Vol 2.' stamp set.  Here are two fabric postcards I created today.

I stamped the 'Emulsion Frame' onto silk.  I used Distress ink for the 'Create' postcard and found that it went very blurry and I liked that effect.  I used VersaMagic for all other stamping and find that it stands up very well to being stamped on silk.  Just make sure that the ink pads are pretty 'juicy'.

It does pay to experiment on scraps of silk or fabric to see how the ink you are using reacts!

I also stamped words from 'Simply Circles' stamp set onto card.

Then I simply layered fabrics, lace tulle and machine stitched them into place.  To complete the postcards, I embellished the leaves with beading and added twine and a word to complete the work.


Sunday 21 September 2014

Scrap Around The World with Darkroom Door


Darkroom Door are sponsoring a prize over at Scrap Around the World this month and some of the Darkroom Door Creative Team have created layouts and journal pages inspired by Scrap Around the World's gorgeous mood board!


I was immediately inspired by the mood board, especially when I saw the stunning colour palette.  The gorgeous opera glasses quickly caught my eye because I have a lovely pair that once belonged to my Great Grandmother.  I have a great love and passion for music and my journal page was all about reminding myself to make time to do more of the things I love!

So this bird-lover is ready to take flight!  Her heart is full and she's all set to dance, love, sing and live a life that fully embraces her dreams!

The Darkroom Door I used:

Sunday 10 August 2014

Pina & Genevieve - Darkroom Door


Say hello to 'Pina'.  She loves to go exploring in the tropics!

To create Pina, I started out by transferring Darkroom Door's 'Tropical Lady' Line Art stamp image onto silk fabric using Lesley Riley's TAP (Transfer Artist Paper).  I also used the same method for Darkroom Door's 'Explore' Collage stamp, but gently water coloured the image before transferring it onto fabric.  I used Tim Holtz Distress pens to colour the stamped collage image on TAP paper.  To do this I scribbled the distress markers onto a plastic palette and 'picked up' the colour with an Aquash brush.  Note:  The image is reversed once it is transferred, but I tried to compensate for that by creating the word 'Explore' by stamping the letters directly onto fabric using Darkroom Door's stamp set, 'Alphabet Medley'.

Then it was a matter of layering fabrics, creating arms and stitching everything together to create Pina, my first Darkroom Door cloth doll.  I added a lei and a flower in her hair to complete the tropical island holiday look.


Now it's time to meet Genevieve.  She loves to be creative and is a crafty girl at heart.


To create Genevieve,  I began by stamping Darkroom Door's 'Crafty Lady' Line Art stamp onto TAP paper and colouring it gently with Tim Holtz distress markers in the same manner as mentioned above and then transferred this image onto silk.  


I then created another fabric panel using images from Darkroom Door's stamp set 'Dressmaker', and two Darkroom Door Texture stamps 'Criss Cross' and 'Star'.  They were stamped within and around Darkroom Door's Frame stamp, 'Emulsion'.

The word 'create' was also made by stamping directly onto fabric using Darkroom Door's 'Alphabet Medley'.


Finally I layered fabrics together to form the shape of the doll and stitched everything together to create the front layer of the doll.  I then embellished it with buttons, ribbon, fabric scraps, trims, laces, a scissor charm and fabric snaps.  I then sewed the front and back together to complete this project.

Darkroom Door's Line Art Ladies are a wonderful way to start a cloth project doll!


Apple Cherry Pie - Darkroom Door


Have you checked out the recently released 'Line Art' stamps over at Darkroom Door?  There are currently six lovely ladies starring in this new collection.  I've used 'Cherry Apple Lady' for this piece.   

To begin with I coloured 'Cherry Apple Lady' with watercolour pencils and an Aquash brush.  I fussy cut around the image.  Then I stamped the image once more, coloured the apples and cherries at the top of her head and fuzzy cut around the fruit.


Next I stamped the wooden spoon and rolling pin found in the stamp set, 'From the Kitchen' with dark brown ink and swiped a lighter brown over the top to give a rich wooden colour and fussy cut around the images.

I layered a folded brown paper bag and some sewing pattern tissue paper onto the front of a folded piece of card, and machine stitched the layers together to create a recipe folder.  I then added the stamped images to the work, including a label, 'Recipes' also found in 'From the Kitchen'.

Finally I free motioned stitched 'Apple Cherry Pie' on the recipe file cover to complete this piece.


I'll be back soon with some more 'Line Art Ladies'.

Hmmm, in the meantime, I think it's time to warm up some yummy apple pie with a cherry on top!

Monday 23 June 2014

About Time


Welcome to the Art Journey and Darkroom Door blog hop! All 23 members of the Darkroom Door and Art Journey design teams have joined together to bring you a 5 day creative extravaganza! Each artist will inspire you with a project using stamps from both of these fabulous companies.


'Time Flies' when you're having fun!  
And I've had so much fun preparing these pieces for my first ever blog hop.  I hope you enjoy your visit here!

In this first piece, I've combined stamp images from both Art Journey and Darkroom Door and discovered just how beautifully they work together!

To begin with, I created a background by layering a number of different scrapbooking papers to create the base of this collage.


Art Journey's 'Fabric' stamp provided the perfect textural effect for the 'grass'.  I used dark green ink with the 'Fabric' stamp, along with two different green background papers and fussy cut around the edges.  I also stamped Art Journey's 'Newspaper' stamp on the base paper, right at the bottom of the piece and then added a section of the sentiment from Art Journey's 'Clocks' stamp set.


I created a bird body and wing shape with some patterned papers and then stamped Art Journey's 'Newspaper' on the body and Art Journey's 'Clock' background, from their 'Clocks' stamp set, onto the wing.  I added some metal embellishments to the wing and an eye with Dimensional Magic.  I covered the wing with Dimensional Magic to add a glossy effect.  The 'Key' from Art Journey's 'Clocks', was stamped onto paper, coloured with a Distress Marker and received the Dimensional Magic treatment too!  The gorgeous 'Top Hat' is from Darkroom Door's 'Steampunk' stamp set.


Here's a couple of embellishments I created using the Art Journey 'Alarm Clock'.  I cut away the clock face from one clock, added butterfly wings and a glass pebble to the face.  With the other, I punched a face from Darkroom Door's Photobooth 'Gentlemen' collage images using a circle punch, layered it onto the alarm clock and added Dimensional Magic to give it a glassy appearance.

I've also added a number of 'Cogs' from Darkroom Door's 'Steampunk' stamp set here, in softer more subtle colours to tie it all together!


With this larger Art Journey 'Clock Face', I added some metal arrows and then used Darkroom Door's 'Alphabet Medley' stamps to create the 'Time Flies' wording, curving below the face.  'Explore' from Art Journey's 'Clocks' was a lovely addition here too.


'Time After Time'

Here's an ATC I created with Art Journey 'Clocks' stamps.  I added some metallic elements (including stitching) to add interest to this piece.  Once again, I've used a Darkroom Door Photobooth 'Gentleman' image as the central piece of Art Journey's 'Alarm Clock', adding Dimension Magic for the glassy effect.  

Products I Have Used:
Art Journey - 'Newspaper & Fabric' and 'Clocks'
Darkroom Door Stamp Sets - 'Alphabet Medley' and 'Steampunk'
Darkroom Door Collage Images - Photobooth 'Gentlemen'

And here's some very exciting news… 
There's a Giveaway to go along with the Darkroom Door and Art Journey Blog Hop!!

Darkroom Door and Art Journey will be giving away a few prize packs, with winners randomly chosen from ALL of the blog hop comments received by Sunday, June 29th. Lots of chances to win some goodies, just leave a comment on this post to enter!

Thank you for 'hopping' by to check out my blog.
I hope you have enjoy today's Darkroom Door/Art Journey blog hop!  I'm the last one on the hop for today.
Your next stop on the blog hop is Godelieve Tijskens.
Please visit her amazing blog tomorrow to see her stunning art work!

Remember, if you find a link that doesn't work, you can always hop back to the Darkroom Door blog (http://www.darkroomdoor.com/Blog) for a complete list to all the blogs in the hop!


Sunday 11 May 2014

Be Cool, Wear a Corset - Darkroom Door


The selection of images in Darkroom Door's 'Corsetry' stamp set are a fabulous mix!  

My starting point for this piece was a Project Life card, which I had lightly covered in gesso.  I stamped the corset onto a scrap of patterned paper, trimmed it to size, affixed it to the card and then stamped the 'lace' image towards the bottom of the card.  Next I stamped the work 'elegant' onto a small piece of organza, gently heat set it and adhered it to the card with gel medium.  A button, a scrap of satin and a couple of snap fasteners were used to embellish the card.

I stamped both advertisement stamps on white card, trimming away the words from one and layered these, along with scrapbooking paper, ribbon and black ric-rac onto a white card.  Finally I stamped the hooks and eyes in the lower right section of the card to complete this project.


Supplies used:  
Darkroom Door Corsetry stamp set
Project Life card, patterned papers and white card
Organza and fabric scrap
Black Onyx VersaFine ink
Ribbon, ric-rac, button and snap fasteners


Wednesday 7 May 2014

Typewriter - Darkroom Door


Having a secretarial background in my distant working life, I was extra thrilled to received the newly released Darkroom Door Collage Stamp, 'Typewriter' to play with.  In the foreground of this photo is a vintage paper punch that belonged to my Poppa.  I keep it in my studio because I love how it looks, however, it came in quite handy for this project.


To begin with I worked on a piece of watercolour paper (the smooth side) and stamped the collage stamp, 'Typewriter' and then added scripted text from the stamp sets, 'Correspondence' and 'Vintage Office,' which both work beautifully with the Typewriter collage stamp.  I also used the postmark stamp in red twice on the background.  I decided to keep the colour palette very simple using only black, grey and red inks, along with shades of white and taupe papers.
Then it was a simple matter of embellishing with other images from the stamp sets, a Tim Holtz pen nib and mini paperclips, staples, vintage postage stamp and text, and finally punched circles with Poppa's paper punch.

Now it might be time to search for my Poppa's old typewriter and put it to use once more!


Supplies Used:
Darkroom Door Collage Stamp Typewriter
Darkroom Door Stamp Sets - Correspondence and Vintage Office
Ink - Onyx Black and Smokey Gray (VersaFine), Red Brick (VersaMagic)
Tim Holtz mini paper clips and pen nibs
White card, vintage novel and old postage stamp


Saturday 29 March 2014

Star Texture Stamp - Darkroom Door


I received another lovely texture stamp from Darkroom Door called, 'Star'.  I set to work on two small square canvases.  First I primed them with warm white, beige and white paints.  Then I heat embossed the 'star' texture using a pale pink embossing powder.

For the canvas above, I embossed two areas on the canvas using sections of the 'Star' texture stamp.  I then painted a little more paint over the embossed areas, rubbed some of it back with a cloth and other areas with sand paper.  I then added a little maroon ink to add more depth to the background.  Finally I stamped a floral image from Darkroom Door's 'Friendship Flowers' stamp set using Distress embossing powder and embellished the piece with lace, velvet, a pearl bead and vintage text.


For this next canvas, once it was primed, I embossed the entire 'Star' texture stamp with pink embossing powder and painted over it.  I then rubbed it back with sand paper.  Next I stamped smaller sections of the 'Star' texture stamp and a different floral image from 'Friendship Flowers' using Distress embossing powder and embellished it with laces, a pearl and vintage text.  

The 'Star' texture stamp creates wonderful shabby chic textural effects!  It's gorgeous!


Wednesday 19 March 2014

Hi - New Darkroom Door Texture Stamp


 Darkroom Door has just released an amazing new collection of stamps this week.                              Go here to check them out!  


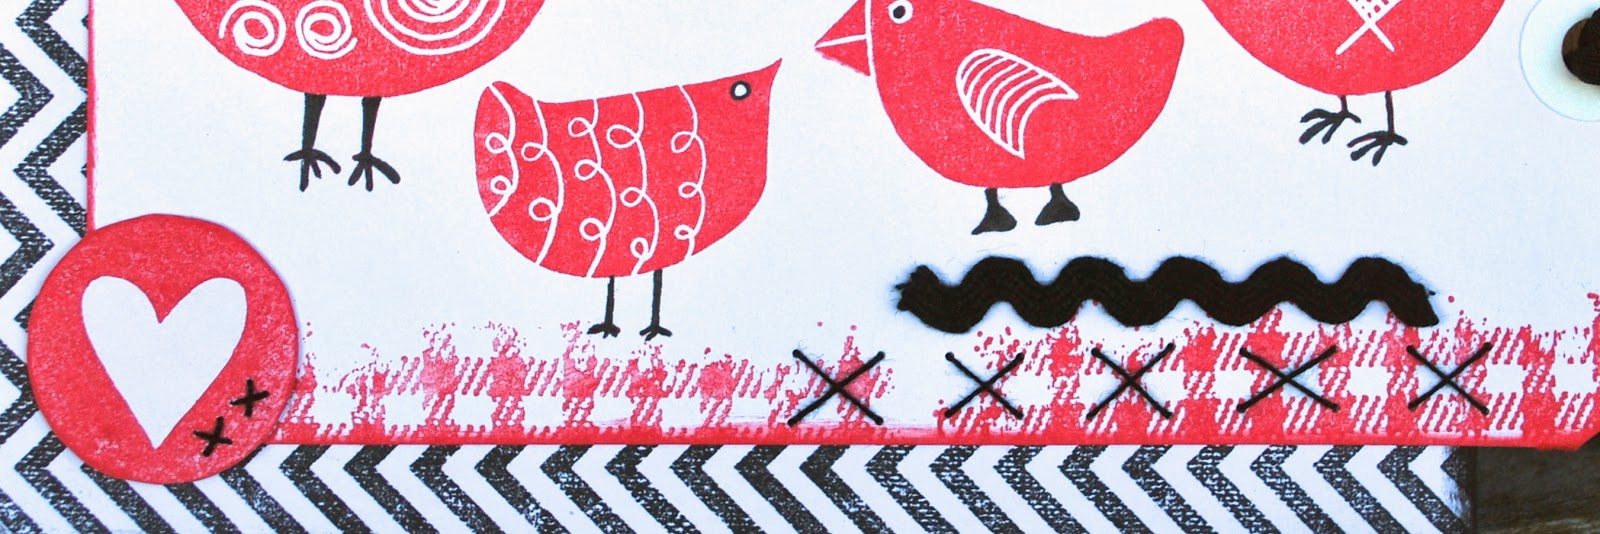
I received the 'Plaid' texture stamp in the mail last week and enjoyed creating this tag card with it over the weekend.


To begin with, I stamped the 'Plaid' texture stamp and five of the birds from the 'Carved Birds Vol 2' stamp set onto a plain white tag with red ink and swiped the edges of the tag with the same ink.  I coloured the eyes and feet of each bird with a black fine liner pen.  


Next I stamped the 'Chevron' background stamp onto a piece of white card with black ink, cut it to size and swiped the edges of that piece with black ink and mounted the tag onto it.  


Finally I embellished the card with two circles (heart and hi) from the 'Simply Circles' stamp set, added a few cross stitches, a piece of black ric-rac and black ribbon to complete the card.  

How simple is that?  I really love the county feel you get with the 'Plaid' texture stamp and it's a wonderful size to work with too!

Supplies Used:
Darkroom Door Texture Stamp Plaid
Darkroom Door Stamp Sets - Carved Birds Vol 2 and Simply Circles
Darkroom Door Background Stamp Chevron
Ink - Midnight Black and Red (VersaMagic)
White card and white luggage tag
Thread, ric-rac, ribbon and black pen


Wednesday 8 January 2014

Dance In The Rain - DARKROOM DOOR

'Dance in the Rain'

Towards the end of last year Darkroom Door had a new release of stamps.  I received some of them in the post and have really been looking forward to playing with them.  Today I've been working on this piece, 'Dancing in the Rain'.  I've used the new quote stamp, 'Dance' which I think is a great reminded to myself to make the most of every situation and to live life with a grateful heart!

I've combined this quote with some of Darkroom Door's paper products including:  Photobooth - Ladies, Art De Fleur and Seaside.   

Darkroom Door's paper products and 50% off at the moment, so if you like them as much as I do then get in quick and stock up!  I'm certainly going to!

Now for some exciting news!  I am super happy to announce that I will be on Darkroom Door's Creative Team for 2014.  What a thrilling way to start the new year!

Tuesday 7 January 2014

Happy New Year!


Happy, happy, HAPPY New Year!!!  

I'm excited to see what new challenges and blessings this year will bring.  How about you?

I've been happily playing 'catch-up' on some postcards that should have been made for an exchange last year.  By the end of the year I was only two months behind!  Now I'm all up-to-date and that is a wonderful feeling!!!

The theme for October's postcard was 'paper dolls' and ARTchix Studios have such wonderful paper doll images to use - I made some very minor alterations to them when I put this card together.  These dolls represent each member of the postcard swap group.  I wonder if you know which doll is mine?

It's lovely to be back and I've got some exciting news to share with you soon.